DIY No-Waste feeder!
Back to blog
DIY No-Waste Feeder Instructions
Materials needed:- A large container with lid. Note: I like the clear containers, so I can easily see when it needs a refill. However, the clear plastic will dry rot in the sun faster than other containers, so be sure to keep the feeder in 100% shade so it lasts longer.
- 4-6 (depending on the size of your container) 3-inch PVC elbows (90-degree).
- Silicone caulk or NP1 caulk.
- Caulking gun.
- A drill.
- A 3.5 inch hole-saw drill bit.
- Something 1 inch tall, to help mark the placement of the elbow bends.
- Safety goggles.
- Helpers/an audience.
Steps to craft your DIY No-waste feeder
Step 1: First, use a level to measure where the elbows will go for your waste free feeder. You want the bottom of the elbows to be at least one inch above the bottom of the feeder, so the chickens have a "well" to peck from.
Step 2: To make the holes, we used a 3.5" hole-saw. Put your safety goggles on! A hole saw is a drill bit designed so you can cut perfectly round holes with your drill. As always, safety first!
As you drill, be careful not to push too hard, as the plastic can crack. We found it was better to let the saw spin and warm up the plastic a bit, before pushing the drill bit through.
A hole saw makes a nice, clean cut. Using other methods to make the holes for your waste free feeder can leave rougher edges that don't fit snugly around the pipe elbow.[/caption]
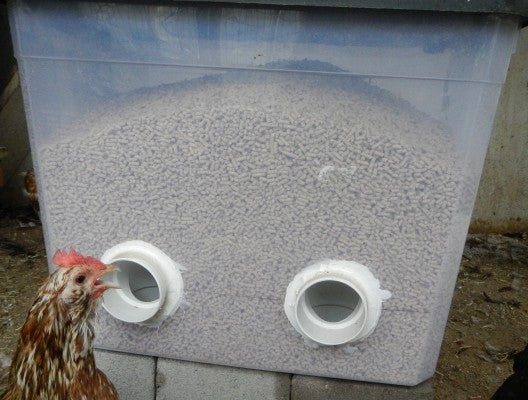
Step 3. Once all the holes are cut, fit the PVC elbows into the holes like so:
Here we have snugged the elbows into the feed tub.
Step 4. Carefully caulk the inside of the bends, to prevent them from slipping out. Then, use your finger to "moosh" the caulk in for a better seal, and let that dry completely. Next, caulk the outside of the elbows, and let it dry.
There is some leeway as to hole size because the caulk will fill small gaps.[/caption]To prevent the weight of the feed from pushing the elbows out, let dry overnight and do a second coat.
Step 5. Finally, place the feeder, and fill it up. Make sure it's low enough that your hens can easily reach, but not so low that it will attract mice or other pests into our coop. Our area is all orchards, meaning there are a lot of rodents around to attract! That's why I wanted the edges of the feeder ports to be high enough that I wouldn't be feeding a new generation.
Total working time? About 20 minutes. You can see my hen is not pleased with the "new big scary thing" in her coop. Still, it didn't take her very long to figure it out![/caption] My turkeys especially love these types of feeders.


1 comment
I’m new to keeping chickens, and we have three hens, so, any kind of helpful information would be great!
———
My Pet Chicken replied:
Welcome to the wonderful and exciting journey of chicken keeping! We have so much information on the website but we have some very specific information that we can email you, too! We are live in chat Monday-Friday from 10-6:00 pm, EST and we would be delighted to answer any questions that you may have. We are all flock owners ourselves, so we have a unique perspective and plenty of experiences to share.